This is a series of articles. Follow the link here to get an overview over all articles.
Goal and why HLS?
My goal was to setup my own streaming server that provides a video livestream using the HLS protocol (Apple HTTP Live Streaming).
HLS itself is very awesome protocol for live streams. You can split audio and video into separate files, multiple audio and video streams for different formats and qualities are possible, easy to read and built in support on Apple devices (iOS, MacOS and tvOS). The data is delivered over a HTTP/HTTPS connection, so it can be also perfectly cached on server side or used in combination with an CDN.
This article contains all my personal experience with HLS in FFmpeg. Some things might have changed and might not be up to date.
Requirements
First of all a new version of FFmpeg is required. During the next steps I will use features that are only available since version 4.0. So be sure, that you use a fresh release.
To be a able to follow my this article with using FFmpeg you should have basic knowledge about audio and video, the difference between container format (e.g. TS or MP4) and codec (e.g. h264, aac, mp3) and to know, how to use a command line.
Input Source
How do we receive the live stream?
RTMP is a common used protocol for this and it’s supported by most of the streaming clients. So we’re starting with our fist parameters of the FFmpeg command:
-listen 1 -i rtmp://martin-riedl.de/stream01
-listen 1 tells FFmpeg to use the RTMP protocol as a server and wait for incoming connections
-i defines the input source. In our case it’s a rtmp source defined with our domain and a stream name. There are a lot of other useful options for the rtmp protocol e.g. usename and password login or defining a different port. The standard port is 1935.
Link to documentation of the RTMP source: http://ffmpeg.org/ffmpeg-all.html#rtmp
Video Encoding
Now our server receives the stream so it’s time to start encoding our video. In the first step, I just want to have a full HD video feed. Later it should be extended to support also lower resolutions. HLS can dynamically switch between different qualities based on the available bandwidth of the client.
-c:v libx264 -crf 21 -preset veryfast
-c:v libx264 is the codec:video. Here we use the x264 codec to have a h264 output format.
-crf 21 is the video quality. 51 is the worst quality and 1 the best. Here you need to decide between video quality and file size (lower value = better quality = larger files)
-preset veryfast tells the encoder to prefer a fast encoding instead of better video compression. A faster preset produces larger files but ist faster. Since we’re producing a livestream here veryfast or superfast is a good choice. All presets are listed in this wiki article. For ondemand content you should choose a slower preset.
All x264 options on FFmpeg are documented under: http://ffmpeg.org/ffmpeg-all.html#libx264_002c-libx264rgb
Audio Encoding
Similar to the video encoding we start with one audio stream.
-c:a aac -b:a 128k -ac 2
-c:a aac sets the audio codec to AAC. Later we will support mp3 as additional audio stream for backwards compatibility.
-b:a is the audio bitrate. This parameter enforces a constant bitrate for the audio stream. 128k is also the default value for AAC if you don’t specify one.
-ac 2 specifies the number of audio channels. Here we use stereo (2 channels).
Output
We’d like to have HLS as the output format.
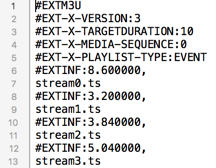
-f hls -hls_time 4 -hls_playlist_type event stream.m3u8
-f hls defines the output format HLS
-hls_time 4 slices the video and audio into segments with a duration of 4 seconds. The default value in FFmpeg is 2 seconds. Apple recommends a duration of 6 seconds.
-hls_playlist_type event tells HLS to not remove old segments. Usually the HLS livestream contains only the last x segments. Older segments are automatically deleted. Using this command no segments are deleted. This gives the user the option to go back in the stream (DVR/re-live) or to pause the live stream.
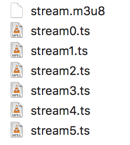
stream.m3u8 is the name of the playlist file. This contains a list of all available segments and is the main file for the player.
First run
Putting all arguments together (the order of the parameters is important; first the input stuff, then the encodings and at the end the output format information) will create the following statement:
./ffmpeg -listen 1 -i rtmp://martin-riedl.de/stream01 \
    -c:v libx264 -crf 21 -preset veryfast \
    -c:a aac -b:a 128k -ac 2 \
    -f hls -hls_time 4 -hls_playlist_type event stream.m3u8
So far, so good. The command produces a live stream. Using the URL for the stream.m3u8 in Safari (because it has built in support for HLS) we can see the live stream.
Having a look into the folder we can see the stream.m3u8 playlist file and the segments. Each segment contains the video and audio data for a short timeframe.
After a look in the stream.m3u8 we have a big surprise: The given target duration of 4 seconds are not used. Instead a TARGETDURATION of 10 is set and the segment length (value after #EXTINF:) is also not constant. A constant value is required for a good buffering in the player. We don’t want any interruptions.
We will try to solve this in the next article.

Hi
Is it possible to append new segments to the previous m3u8 file?
As far as I know it is not possible to do this directly with FFmpeg.
Is there another way you know that I can do that, even if it’s not with FFmpeg?
So far what I have found is that you can replace #EXT-X-ENDLIST with #EXT-X-DISCONTINUITY and then paste the new segment in the first file and it works. However, for doing that the only way I can think of is to treat it like a text file and do some text processing, but I feel that there should be a better way to do it. I’m working with Python if that helps.
Example:
First chunk:
#EXTM3U
#EXT-X-VERSION:4
#EXT-X-TARGETDURATION:1
#EXT-X-MEDIA-SEQUENCE:0
#EXTINF:1.000000,
#EXT-X-BYTERANGE:78020@0
writer-00.ts
#EXT-X-ENDLIST
Second chunk:
#EXTM3U
#EXT-X-VERSION:4
#EXT-X-TARGETDURATION:1
#EXT-X-MEDIA-SEQUENCE:0
#EXT-X-DISCONTINUITY
#EXTINF:1.000000,
#EXT-X-BYTERANGE:74260@0
writer-10.ts
#EXT-X-ENDLIST
Combination:
#EXTM3U
#EXT-X-VERSION:4
#EXT-X-TARGETDURATION:1
#EXT-X-MEDIA-SEQUENCE:0
#EXTINF:1.000000,
#EXT-X-BYTERANGE:78020@0
writer-00.ts
#EXT-X-DISCONTINUITY
#EXTINF:1.000000,
#EXT-X-BYTERANGE:74260@0
writer-10.ts
#EXT-X-ENDLIST
Also, doesn’t FFmpeg do this while live streaming? It creates ts chunks every few seconds but there is only one .m3u8 file, so I assume that ffmpeg internally “updates” the m3u8 file also.
Update: There seems to be a flag for this: -hls_flags append_list
“Append new segments into the end of old segment list, and remove the #EXT-X-ENDLIST from the old segment list.”
Your style is really unique in comparison to other folks I’ve read stuff from.
Thank you for posting when you have the opportunity, Guess I’ll just book mark this site.
Great article, but i´m not understood.
1 – How to make it work on windows ?
2 – How to create a hls (with several audios channels and subtitiles) from a mkv file ?
3 – I would like to create the files locally and later upload on my server (rather then using the “listen 1 -i rtmp://martin-riedl.de/stream01” . How to make it crate the list of files and directories on a way that i can create a bunch of ts files from a single mkv one ?
4 – Can you please explain how to create the subtitles in both formats ? Srt and webvtt ? in order to hey also works on hls pieces ?
Regarding windows: You should be able to execute the commands also under windows. I’m personally using only Linux and MacOS but Windows should be the same. It has just an issue with the ./ at the beginning of the command. You should simply remove this.
If the “command is not found” you can also drag&drop the FFmpeg file in a new CMD window and just add then the rest of the command.
The other questions will be answered in future articles. So stay tuned.
Tks for answering Martin
I did not saw you answered it yesterday 🙂
Just landed on that page and as i really like what and how Martin explains everything easy and in steps. Regarding the Windows you can download binary of ffmpeg and if you want to run the commands from this article(notice he is using \ at the end of each line which works fine in MaC but if you try that in windows it will complain) What you can do is replace the backslashes(\) at the end of each line with ” ` ” not sure what what the name of that char is and execute that with your files in powershell and it will work i tried it does the HLS segmenting much faster than what i was doing until now :). So thanks Martin!
Hello I have a stream that goes through rtmp:/ / 192.168.0.1/live/air.flv from OBS. How do I execute your command in cmd so that the thread turns out http://192.168.0.1/hls/out.m3u8? ffmpeg -listen 1 -i tmp://192.168.0.1/live -c:v libx264 -crf 21 -preset veryfast -c:a aac -b:a 128k -ac 2 -f hls -hls_time 4 -hls_playlist_type event out.m3u8?
The “-listen 1” is only needed, if FFmpeg should act as a RTMP/HTTP server for the input. In your case you should omit this and just pass the path of OBS directly into FFmpeg using -i “rtmp://192.168.0.1/live/air.flv”.
In general: FFmpeg creates only the files into local folders. If you want to access on this files using a HTTP URL you need a webserver like nginx or apache2 additionally to serve the files.
Hello, I’ve the same situation. ffmpeg is creating hls stream files locally but I don’t know how to put those files in the hls folder in nginx-rtmp server to be served as http url.
excellent and very well explained. Thank you.
I have a question I am encoding 360 degree Video using this command sudo ffmpeg -i 360video.mp4 -vcodec libx264 -vprofile high -acodec aac flv rtmp://localhost/live/stream, When I play my stream(nginx webserver in the backend) http://localhost:8080/hls/stream3.m3u8, its playing side by side and 360 view is somwhow missing. Can you help me how can i preserve this data and make sure my plays playback 360 degree video as it is.
Does FFMPEG support HLS Ingestion on YouTube? (through HLS V2 spec – see https://developers.google.com/youtube/v3/live/guides/hls-ingestion)?
As far as I know is that FFmpeg doesn’t support this right now.
i searched and it’s work good too
https://gist.github.com/lukebussey/4d27678c72580aeb660c19a6fb73e9ee
Thanks for sharing. This has a view problems: It is just re-muxing the content. So FFmpeg tries to split the files as good as possible (depending on the source material). So it’s not conform the Apple HLS Guidelines but may work.
Also it works just with a static file.
If you follow my guide, you learn how to encode the video/audio correctly and also optimize the stream for Apple devices.
Hi Martin,
I have got everything working but uploading to a hls server is not smooth.
I have a windowsdrive letter linked to a external HLS server.
I see very high CPU and network upload peaks with direct upload to a linked driveletter.
(So let FFmpeg direct stream to this driveletter)
I don’t see this when I stream the hls files to a local folder on the system.
Then the CPU load is then nice at a constant level.
Is there a way to let FFmpeg smoothly upload the HLS files to a external server?
Maybe in a second thread?
FFmpeg supports uploading the data directly to a server using the “method” parameter. I have never used it myself but check out the documentation:
https://ffmpeg.org/ffmpeg-all.html#Options-44
method
Use the given HTTP method to create the hls files.
ffmpeg -re -i in.ts -f hls -method PUT http://example.com/live/out.m3u8
This example will upload all the mpegts segment files to the HTTP server using the HTTP PUT method, and update the m3u8 files every refresh times using the same method. Note that the HTTP server must support the given method for uploading files.
this does not worked for me!!! :(((( please tell me whats wrong martin!
Tell me what error you get.
These are awesome articles. Awesome. I have a much better working understanding of HLS, thanks to you.
I have a question. Suppose I use FFMPEG to stream video1.mp4. It generates all the ts files and the M3U8 file perfectly fine and streams nicely. But then once video1.mp4 is done playing I want to switch to video2.mp4. When this happens, FFMPEG overwrites the first M3U8 file and the player stops streaming and has to be restarted.
How do I keep the stream going from video 1 to video 2?
There exists some flags that might help you e.g.:
hls_flags append_list+ omit_endlist+ discont_start
append_list = Append new segments into the end of old segment list
omit_endlist = Add the #EXT-X-DISCONTINUITY tag to the playlist, before the first segment’s information.
discont_start = Do not append the EXT-X-ENDLIST tag at the end of the playlist.
https://ffmpeg.org/ffmpeg-all.html#hls-2
Thank you for the Tutorial. I’ve implemented it and it works great. One thing is, that the source stream is sometimes a bit unstable which obviously leads to ffmpeg failing:
“Input buffer exhausted before END element found”
Then ffmpeg shuts down. Is the best solution here to put my ffmpeg command into a loop to restart it as soon as the error occurs, or is there a way for ffmpeg to ignore the error and wait for new results? Do you have an idea, where I could find something about this in the documentation?
Thanks
You can tell FFmpeg to ignore errors and try to continue with:
ffmpeg -err_detect ignore_err -i myinput….
More details: https://ffmpeg.org/ffmpeg-all.html#Codec-Options and https://superuser.com/questions/1123400/ffmpeg-malformed-aac-tracks-sound-perfect-in-movie-studio-but-return-input
Hi, i apreciate your effort to put all content in this simple and easy to read way.
I would like to know, if you have a perspective to create live-stream with dash-protocol.
Thanks. So far I have no experience with MPEG-DASH. Just know, that some parts are very similar to HLS (e.g. fMP4 segments). Don’t expect a tutorial from me soon.
How can I add CODECS attribute mentioned here:
https://developer.apple.com/documentation/http_live_streaming/example_playlists_for_http_live_streaming/creating_a_primary_playlist
The CODEC attribute is automatically added in the master playlist. Use the parameter “master_pl_name” for creating one. More details in Part 3 of this series.
Hi Martin! I’ve installed Canvas LMS on a cloud server. I wanna know how can I integrate this into the Canvas platform so that users can watch videos over different devices. Do I have to edit some configuration files, or is there a more direct way to perform such integration?
Thank you in advance!
Martin you are saving my a…s in 2024 🙂 Thank you man